Import and Export
You can import and export items to a variety of systems, including. Excel spreadsheets, MS Project files, and other Allegra instances.
Importing items from Excel
You can import items from Excel spreadsheets. If Allegra recognizes that an item from the Excel spreadsheet already exists, it is not recreated, but modified if necessary.
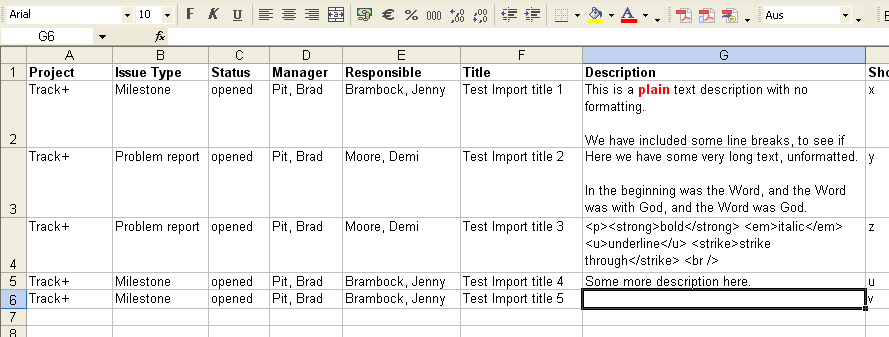
To create items from an Excel spreadsheet, the sheet must contain the required data. The first row of the spreadsheet contains the field names, and all subsequent rows contain task data, one item per row.
If possible, make sure that, before importing, the following are true:
all persons in the Excel spreadsheet are in “Last Name, First Name” format
all people are registered as users in the Allegra system
the people in the project you want to import into have appropriate roles as managers or editors
all date fields are in the format YYYY-MM-DD
If the table contains a WBS column, the WBS code determines the hierarchy level. You do not have to specify unique numbers. For example, all items at the first level could have a WBS code of “1”, all second-level items a “1.1” code, and so on.
Importing Items from Excel
To import items from an Excel spreadsheet, go to the Item Navigator and drag the file you want to be imported to the right workspace of the navigator.
Select the sheet within the Excel file from which you want to import items. Allegra will attempt to map all columns in your Excel sheet to matching fields. You can control this mapping process manually. Also, Allegra will remember your last mapping definitions and reuse them in all subsequent imports. All subsequent imports will then no longer require a mapping step.
In the next step, you have to specify how Allegra should handle required values that it cannot find in your Excel spreadsheet. There are two options: either reject the row, or insert a default value.
If there is a problem with the spreadsheet, Allegra will give you hints about the affected row and the data. You can then correct the table and upload the file again. If all goes well, Allegra creates an item from each row in the spreadsheet. You can only import system and custom fields. It is not possible to import editors and readers, or costs or budgets.
You do not need to enter a project in your spreadsheet. During the import process, you can select a project for all items.
The order of the columns is not important. However, you should keep the same order in all imports to minimize the configuration effort.
Column headers should be mapped to the appropriate Allegra fields. If a column header is not assigned, the values from that column will not be imported. Allegra tries to map the table’s column headers to their own fields as best it can. For this matching, the following elements are considered:
the localized field configuration (localized field labels)
the non-localized field configuration (original field labels)
the field names
If Allegra cannot find a suitable mapping, you can complete the mapping manually. The Import Wizard shows the field labels as in the Allegra global scope.
As soon as the “Next” button is clicked, the created mapping is saved in a user-specific directory and will be used as default mapping for the next import.
Composite fields are contained in a single column. The different sections of a field must be separated by a “|” character. For multiple value fields, all values are contained in the same cell, and different values must be separated by commas (“,”).
Each table row is validated in several steps before an item is created from it:
It is checked whether all required fields are present. This means that they are either defined in the table and associated with the required field or you have selected that default values should be used if there are no values in the table.
For each cell value, a check is made to see if it is valid. The specific handling depends on the type of cell.
Label (text) Fields: Select list entries are indicated by their labels. For persons, the format is “Last name, First name”. It checks if an entry with this label exists. If it exists, it checks whether it is valid or not. For example, for manager, it checks that this person actually has manager privileges in this project, and so on.
Boolean (check boxes) Fields: The Excel cells should either be of Boolean type or the text value should be “Y”, “N”, “true” or “false”.
Numeric Fields: Either the Excel cells must be of the numeric type, the number format should match the user’s locale, or it should be in ISO format. Other values are interpreted as text as they appear in the cell.
Date Fields: Excel cells should either be of the date type, the date format should match the user’s locale, or the date should be in ISO format (YYYY-MM-DD).
A check is made for each row to see if this item already exists. The most robust identification is possible if you keep the Allegra item numbers in your Excel sheet. If this is not possible, you can define a combination of identification columns that should uniquely identify each item.
For example, you can combine the author, project, and title as a unique identifier. This implies that these three fields are not changed between imports and that their combination is unique. If no matching item is found, a new one is created. If a matching item is found, the changes from the non-identifying columns are transferred.
Each row is validated against the regular field validators before being added, just as when creating an item from the user interface.
If all of the above validations are successful, the row is created or modified as a new item in the Allegra system.
Conflicts can occur when importing data from an Excel sheet, for example, if Allegra has identified an Excel row as an existing item, but there is conflicting data within that item between the Excel version and the Allegra item.
If there is no Last Edit Date column in the Excel sheet, no usable history data is available. In this case, if there is a conflict in a field value, the system will not be able to decide for itself which value is more current.
If data for the last edit date is available in Excel, Allegra can perform intelligent conflict handling, because it can take into account the chronological order in which changes have occurred. The handling differs for fields where explicit history is enabled compared to those without explicit history. You can select an explicit history for all fields, but this is not the default.
If field history recording is enabled, Allegra resolves conflicts by checking whether the first old value from Allegra history (after the last edit date) is the same as the actual value from Excel. If the values match, then the change was made only in Allegra and not in Excel. Consequently, the Allegra value is silently preserved and the user is not prompted for conflict resolution. Otherwise, the user will be involved in conflict handling.
If a field does not have an explicit history record, field changes are only recorded in the shared history. For such fields, there is no reliable way to find out whether they were changed only in Allegra or also in Excel. Therefore, if there is at least one shared history entry in Excel after the last edit date, any changed field without explicit history is subject to conflict handling.
If there is no history data since the last edit, Allegra overwrites the values with those from the Excel file without conflict resolution.
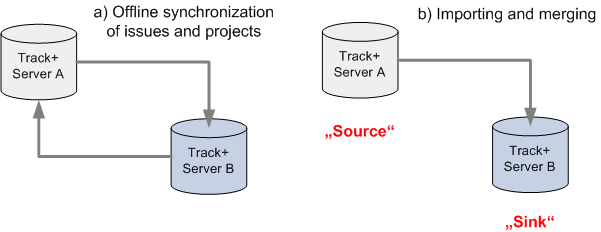
Importing data from other Allegra installations
You can import data from another Allegra installation, for example, to merge two different installations together. This powerful item can have far-reaching implications for the importing system and is therefore available only to system administrators. This section describes what happens during this type of import.
Allegra allows you to transfer items and all associated data from one instance to another. In the following explanation, we refer to the Allegra instance from which the data comes as ‘the source system’. The receiving instance is referred to as ‘the target system’.
Importing data from other Allegra instances
In order to import data from another Allegra instance, you must be logged in with system administrator privileges, for example, as the admin user.
Attention
When importing data from another Allegra instance, users, workspaces, and configurations, among other things, will be into the target system. However, the users are disabled.
Please also note the following:
Input forms and form assignments are not imported. This means you may not see some fields that are visible in the source system.
Allegra tries to match all items from the source system with its own items to avoid duplication of items, users, attributes, etc. Users are identified by the combination of login and email. Most other objects are matched by their universally unique identifier (UUID). Custom list items are matched by their labels. Items are matched by their UUIDs rather than their item numbers.
In the import process, all item numbers are read first. Embedded links (i.e., those to items in the description text) and other links are not matched and imported if they reference items that are not in the imported record.
If you specify a custom field of type “Text” in your target system and name it “OldTrackID”, the item numbers of your exporting instance will be stored there for reference. Also, a file is written to TRACKPLUS_HOME with a mapping containing the new item numbers and the corresponding old item numbers.
If the import record contains workspaces that do not exist in the target instance, those workspaces are recreated. In this case, any role used in the source system that does not exist in the target system will be added. Users are assigned the exact roles in these new projects that they had in the source system.
No role assignments or roles are added for existing projects.
New users are added as disabled users.
The import item can only add data, meaning that no data will be deleted. For example, if attachments have been deleted in the source system since the last synchronization, those attachments will remain active in the target system.
To import data from another instance, drag the source ZIP file to the right workspace of the navigator.
The data in the file is imported into your Allegra instance and merged with the existing data.
Export to an Excel file
You can export the items shown in the Item Navigator to an Excel file.
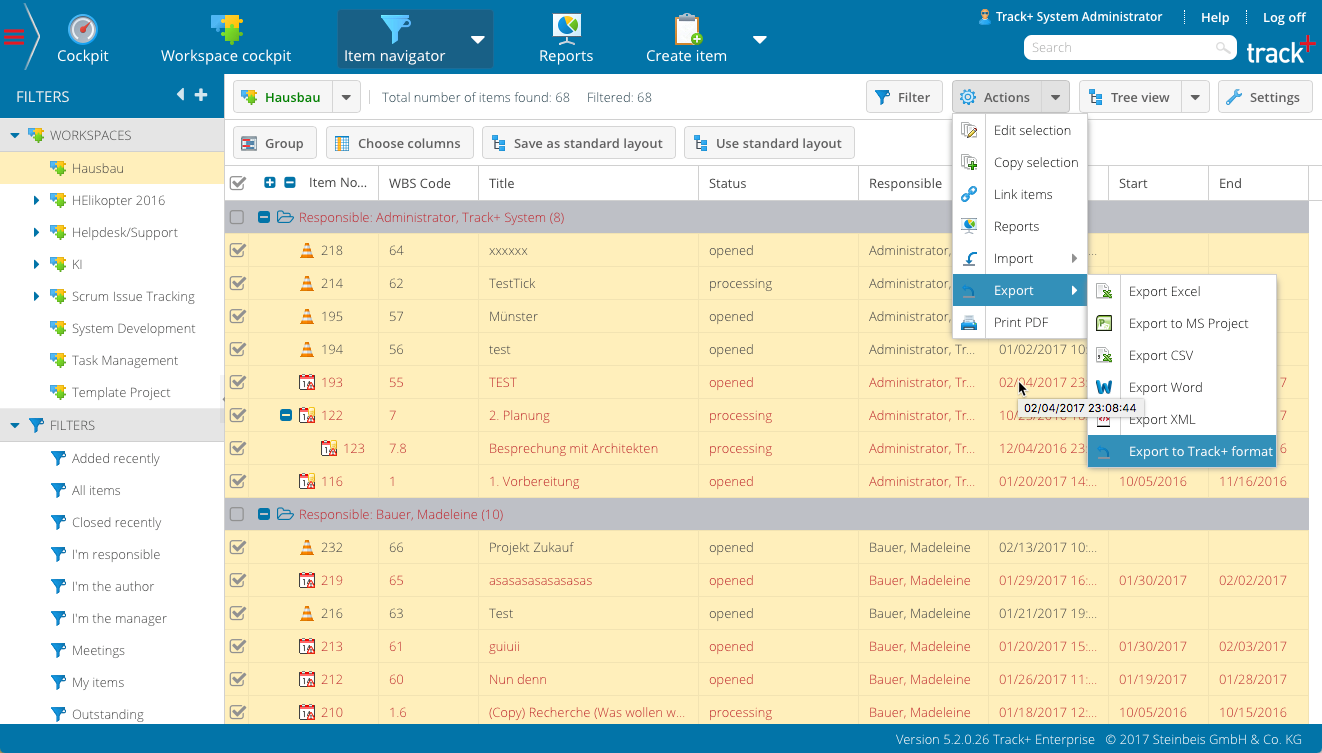
Select the items that you want to export. Only selected items will be exported.
Click on the “Action” button and select Export > Excel from the menu.
Download the Excel file to your local computer. You can open this file directly in Excel or OpenOffice.
The Excel file contains all the current properties of the items selected in the Item Navigator. The Excel file does not contain any change history due to the limitations of the format.
Export to a CSV file
You can export the items shown in the Item Navigator to a CSV formatted file to import them into those applications that can read this format.
Note
You can specify the delimiter used in the CSV file in your personal profile workspace, as it may depend on your version of MS Office and the locale on your client computer.
Click the “Action” button and choose Export > Export CSV from the menu.
Download the CSV file to your local computer. You can open this file directly in Excel or OpenOffice.
The CSV file contains all the current properties of the items shown in the Item Navigator. The CSV file does not contain any change history due to the limitations of the format.
Export in Allegra format
You can transfer data from one Allegra installation to another. Allegra allows you to transfer items and all associated data from one instance to another. In what follows, we refer to the Allegra instance from which the data comes as ‘the source system’. The receiving instance is referred to as ‘the target system’.
Exporting items to another instance
To prepare an export, note the following:
You must be logged in as a user with system administrator or system manager privileges (for example, user admin).
You must have at least read access for each workspace from which you want to export items.
To export, first use a filter to create a list of items to export in the activity navigator. In the selection column on the far left, select the items to be exported. Note that in the case of a hierarchical view, the list is expanded completely.
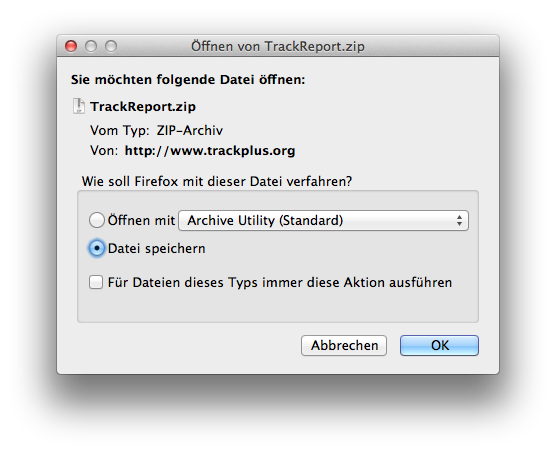
The export process creates a ZIP file with all the data and attachments that you can import into the target installation.
Exporting items to another instance (2)
Go to Actions > Export > Export to Allegra Format in the toolbar. A download box will appear.
Exporting items to another instance (3)
Save the file on your local drive. In our example, this file has a size of about 9 MByte. The size depends a lot on the size of the attachments. This file can later be imported into the target system.