Creating HTML Templates
You can use HTML/FreeMarker templates from the Wiki to create PDF documents. This section explains how to convert text and metadata from your Wiki document to a PDF document using an HTML/FreeMarker template.
Develop HTML template
To develop HTML templates, all you need is a web browser with debug functionality. You should have project administrator rights or be logged in as a system manager or system administrator. Go in the administration to Templates > Wiki Export Templates. Open the folder “HTML-Templates” and, in it, the desired template folder.
It is easier if you start from an existing template when developing your own templates.
The template structure
An HTML template consists of a ZIP file with the extension “.hlx”. The template can be uploaded directly in the Wiki or in the administration by authorized persons.
The next figure shows an expanded template. The individual files and folders are explained below.
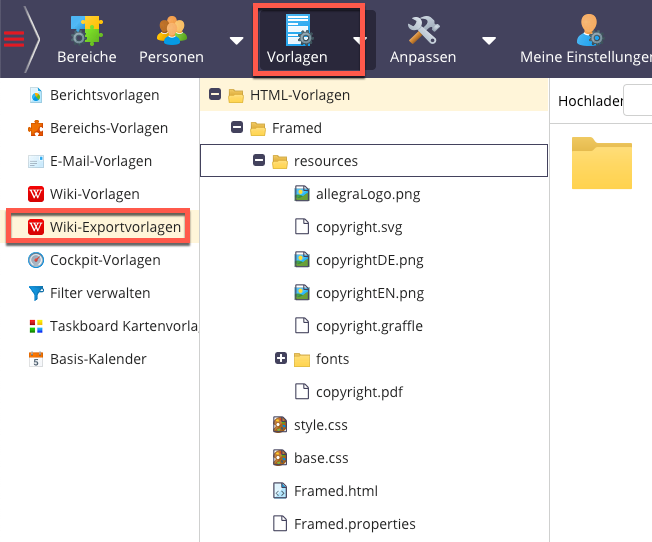
Expanded template
{template name}.html: Example:Framed.html. The ZIP file must contain an HTML template file, that has the same base name as the ZIP file. For example, if the ZIP file is namedFramed.hlx, it must contain a file namedFramed.html. The HTML file may contain FreeMarker expressions.{template name}.properties: Example:Framed.properties. This element is optional and contains parameters to control display characteristics (see below). This file may contain FreeMarker expressions.Directory
resources. This element must be called exactly that. Directory contains images and other resources.fontsdirectory. Must be named exactly like this and contains fonts for the creation of a PDF document.One or more CSS files
The template file
The template file is a simple XML file with FreeMarker expressions.
Please make sure that the template file is a valid xhtml file (all tags are closed). The template file and the
template name must be identical. The extension must be .html. This file can contain FreeMarker expressions
in this file.
All document fields can be used as FreeMarker expressions by entering the unique field name. by entering the unique field name. The field names can be accessed from Perspective Administration > Customize > Task Attributes or in the Task Navigator via the column selection.
In addition, there are several other FreeMarker variables:
cssBasePath: the absolute path to the template directory. Example: href = “${cssBasePath}/base.css”
- imgBasePath: the absolute path of the
resourcedirectory as seen from the template directory Example:
${imgBasePath}/allegraLogo.png
- imgBasePath: the absolute path of the
summary: the summary (contents table) of the document
wikiContent: the content of the Wiki document without summary
pageLbl: the localized word “page”
ofLbl: the localized word “of” (page 1 of 17 or page 1 / 17)
IssueNo: the ID of the document (global or workspace specific)
parentSynopsis: the title of the parent item, if any
timeStamp: the time at which the PDF document was created
licenseHolder: the name of the license holder
locale: the locale of the user
The template configuration file
If the template directory contains a {templateName}.properties file, it will be used by the system.
The file is optional and it may contain FreeMarker expressions. All document fields can be used as
FreeMarker expressions. Available configurations are:
contentMaxWidth: this is an integer number. If the “width” attribute of an image or table is greater than this value (in pixels), the corresponding object is scaled.
watermarkImgName: the name of an image file whose image is to be used as a watermark
watermarkText: this text will be centered and possibly rotated as a watermark on each page
watermarkTextSize: in dots (points)
watermarkTextColor: color in hex notation
watermarkTextRotation: rotation, 0 is horizontal and 90 is vertical
All fields are optional. If both watermarkImgName and watermarkText are defined, watermarkImgName has priority.